I was recently posting an issue in the Developer Forum for Trello and found a post I could answer fairly quickly since I knew the answer already. Thought I would share it here on my blog as well.
The question was along the lines of:
How do I show my board button only to members of the board who have paid for it? Or how do I block guests from getting the board button?
Here is the code:
This file contains hidden or bidirectional Unicode text that may be interpreted or compiled differently than what appears below. To review, open the file in an editor that reveals hidden Unicode characters.
Learn more about bidirectional Unicode characters
message: "Sorry you are only a guest on this board!",
duration: 1,
});
return []; // no board button for you
}
/** @type {TrelloBoardButtonOption} */
const button = {
text: "hello",
icon: `data:image/png;base64,iVBORw0KGgoAAAANSUhEUgAAABAAAAAQCAYAAAAf8/9hAAAAAXNSR0IArs4c6QAAAARnQU1BAACxjwv8YQUAAAAJcEhZcwAADsIAAA7CARUoSoAAAAF2SURBVDhPtZMxT8JQEMfb0pI2xMbA0JWyNXQEJLHO7VrmfgAHTfgMLMTo0FknDU0TNze+gCbOSmSBwU2hgxMlAevd8wV95GG6+Euu73/v/e/aXlPhX8myrIBBUy4iXRmCIDicTqeeqqoHmKdp+lir1YaDweCeGHZx1u/vHTnOpWEYqSiKGWyRQI17juNc9cFDzNvEUay2ms1bkJtCXjTBE0WRCprFc70TTdO4Rb8DPa7rnoL+odfr6bZtP4HkFm0HeJ+xBrQg4WU+n7eSJLFR5wH8dfC3UJMGy+WyDJNGmQvwC4vFooyaNFAUZVUo/Pm5GdBbLBZXqEkD2Bjpuv6BOg/olSRpRNNv2u32NSzcoW0HeG9gJZAnQOx6/cKsVmc03YlZNWfgPacpi+/7rmma7yC5d8azDnhAb2AmNx6PJ77fGWqaqsmyvF8qleB19c9KpfJqWdZdo9E4juP4gdoJ3J8J6Xa7BgzXQr1er1/CMHwjBwyC8AW6vpgYpmCzMQAAAABJRU5ErkJggg==`, // for card front badges only
Are you a Trello enthusiast looking to start developing you own Power-Up? Trello Power-Ups are custom integrations add new functionality to your Trello boards, and creating one yourself is easier than you might think.
I created the following tutorial to walk you through the process of developing a Trello Power-Up in Visual Studio Code using npm (Node Package Manager). By the end, you’ll have a basic project that you can further enhance as needed. But this will take you some time. I took my time walking through this and it took me a good hour to get through all the steps below. The good news is once you have done this, you will have a quick, easy to use project that is totally reusable for multiple Power-Ups. With that said, let’s get started…
Prerequisites
Before we dive in, make sure you have the following prerequisites:
Node.js and npm: If you don’t have Node.js and npm installed, download and install them from the official website here.
Trello Account: You’ll need a Trello account to create and test your Power-Up.
Once you have VS Code install, here are some suggested Extensions to make your life MUCH easier:
ESLint
Code Spell Checker
Prettier – Code formatter
Inline HTML
Something to read so you can get an idea of how powerful VS Code can be with extensions and other capabilities, here is more about JavaScript development in VS Code: https://code.visualstudio.com/Docs/languages/javascript
Step 1: Create your Project Folder
In the least you ONLY need two files [index.js] and [index.html]. But it helps to build out your project with the proper folder structure right off the bat. So here are the folders I create:
[certs] – required for local development and covered later
[js] – for all your code files
+– [common] – where you will keep common files (usually static defined stuff)
+– [pages] – for all your js page files (more below)
+– [components] – we will not get to this here, but might cover it in a future post.
When I decided to make the Type Definitions file for Trello Power-Ups it CHANGED MY LIFE. Now, it is not perfect and I am still working on adding things to it, and find errors every now and then, but please notify me if you find anything wrong. But when I added this to my project it took the guesswork out of creating a Power-Up, in that “what does this return”, or “what are the properties of this or that.” And I did not have to have the Trello API reference page open in the browser all the time. My code got cleaner, more concise, and I was able to more quickly develop Power-Ups.
Step 2: Add files and Code
So, now we add the files.
If you do things “creatively” – correctly in my opinion – you really only need one HTML file for your WHOLE project even if you open multiple forms.
In the [views] folder, create the [index.html] file:
This file contains hidden or bidirectional Unicode text that may be interpreted or compiled differently than what appears below. To review, open the file in an editor that reveals hidden Unicode characters.
Learn more about bidirectional Unicode characters
Now in the root of the [js/common] folder you will create a file [common.js]:
This file contains hidden or bidirectional Unicode text that may be interpreted or compiled differently than what appears below. To review, open the file in an editor that reveals hidden Unicode characters.
Learn more about bidirectional Unicode characters
Now in the root of the [js] folder create the [client.js] file:
This file contains hidden or bidirectional Unicode text that may be interpreted or compiled differently than what appears below. To review, open the file in an editor that reveals hidden Unicode characters.
Learn more about bidirectional Unicode characters
Hooking to the board buttons callback from Trello and adding a custom board button
The button calls the Trello List Popup (essentially menu), when clicked.
In that menu, I added ONE item, to show the settings in a pop-up iframe. Now, this is where things get interesting…
You might see how I might be doing something different from what Trello tutorials might have you doing. But if you look at the iframe reference, to Common.detailsPage, you will see that we added that as “details.html.” But WAIT, you did not ask me to create that page, so how is it going to work? Trust me, it will and in a moment, I will show you how it all works out. First clue is something called Web Pack. The second is pay close attention to the ARGS we are sending.
Next, create a new file called [details.js] and place it in the [js] folder with [details.js]. Here is the code for that page:
This file contains hidden or bidirectional Unicode text that may be interpreted or compiled differently than what appears below. To review, open the file in an editor that reveals hidden Unicode characters.
Learn more about bidirectional Unicode characters
What we are doing here is setting this up for “reuse.” Gosh, I love that word. “Reuse,” said it again. REUSE. Ok…
So, we read the PAGE args (remember how I told you to pay close attention). I ask Trello for the arg passed call “page” and from that get which page to load. I then create an instance of a page object.
Now this is where I love, love, love ES6 and classes. I created an instance of the SettingsPage class and called render on it, passing the ever-important reference to the Trello context object (t). But what the heck, there still is not a Settings Page and details.html still does not exist??? Wait for it…
Now, in the [pages] folder, you will create the [settingsPage.js] file, and you will add this code:
This file contains hidden or bidirectional Unicode text that may be interpreted or compiled differently than what appears below. To review, open the file in an editor that reveals hidden Unicode characters.
Learn more about bidirectional Unicode characters
What we are doing here is PURE ES6 GLORIOUS MAGIC. I generate a string using inline HTML (via the beautiful backtick), and you will see some VS Code fun stuff (/*html*/), this makes your code look like React inline HTML via the Inline HTML extension. OMG, it is awesome. Ok, then remember in the [index.html] file the div with the “id” of “content.” Well, I then assign the HTML string to the content div and viola, the settings page comes alive in the iframe of the Trello Popup window – just like that. And then because it is dynamic, I hook to the controls I created, add event hooks and such. I then call t.sizeTo() to tell Trello to fit the contents of the iframe neatly into the Popup window.
Hey, but there still is not a [details.html] page… should I not go and create that? NO!!! It’s coming, I promise.
Now, that is it for the code that makes your Power-Up tick. The rest is getting the development environment configured for runtime testing and building your code via Web Pack.
Step 3: Set Up Node and Web Pack
So, writing the code is half the battle. You could just make a copy if index.html and called it details.html place all the above code on a web server and call it a day. And everything will run.
But building a Power-Up and being able to update and test your code live is crucial to being able to make a compelling Power-Up in short order. You could just make changes, publish to the web, test, rinse – repeat. But it will take you a long time, frustration and for just a little more work, you will get SO MUCH MORE. And finally, your code will not be optimized (minified) for better browser runtime compile. So, here is how you round out your development environment for a Trello Power-Up.
Next thing you do is create a [package.json] at the root of the project folder. This file will tell NODE which packages to go pull of the Internet so that you can do the paragraph above. Here is the code:
This file contains hidden or bidirectional Unicode text that may be interpreted or compiled differently than what appears below. To review, open the file in an editor that reveals hidden Unicode characters.
Learn more about bidirectional Unicode characters
The next thing you need is the Web Pack file. Ok, remember how I kept putting off the creating the [details.html] file. Wait for it…
The following file is going to look rather complex if you have not used Web PAck before. What this does it tells NODE how to “compile” your code and setup the development environment for local development testing.
So, let’s get started by adding the following file to the root of you project folder [webpack.config.js]:
This file contains hidden or bidirectional Unicode text that may be interpreted or compiled differently than what appears below. To review, open the file in an editor that reveals hidden Unicode characters.
Learn more about bidirectional Unicode characters
I am not going into huge depth explaining this file as that is a whole post on its own. Bottom line what this is doing is configuring web pack. I will explain it like this:
defines the core entry points as chunks [detial.js] and [client.js].
in the plugins section, you will see the “reuse” coolness I was referring to above. On the fly we use the same file [index.html] for creating TWO files: index and details. And there you have it.
the devServer is the last bit that makes this whole journey worthwhile. This creates a NODE server on your box, running on port 12345.
Your own Dev Server running locally on your box is the key but it will not work without this next bit. Trello REQUIRES all connections to be protected by HTTPS, so you MUST have SSL certificates.
Generating certs is a mild amount of pain, but with a LONG-TERM gain. So, you WILL need to do this part. And it is not hard. Here is how you generate a cert (and key) for yourself:
It will ask you for a passphrase (something like “test” is ok), and to confirm the passphrase, then country, state, city, company, unit, and such. Nothing is critical here, put what you want for these fields.
It will create two files in the root of your project [server.crt] and [server.key].
Move these files to the [certs] folder.
And this cert is good for 10 years, so you can add it to all your future projects.
You are now ready to start development. Open a terminal (press CTRL+`) and in the root directory of your project, run the following command to enable/init/update the project:
npm update
This pulls in all the bits to make your development environment come alive.
Step 4: Setup Trello Admin Panel
To test your Power-Up, you can use the Trello development sandbox. Ensure you’ve created a Trello board and head to https://trello.com/power-ups/admin to enable the developer mode (see Trello documentation on this part).
Then, add your Power-Up to start testing. Here are the steps for our demo:
You will see a REJECTION, something like: Your connection isn’t private!
You must click Advanced, then click [Continue to localhost (unsafe)]
You can get around this by adding the certificate to the Trusted Root Certificate Authorities on your computer. But that is different for Mac and Windows users, so I will let you look that one up on your own.
By the way, I never do that. I just ALWAYS run this step before I run locally. Just remember if you go into Trello and it appears to hang and your Power-Up is not loaded… did you forget this step?
Now we go to Trello to add your Power-Up. Go to Trello, and go to your board:
Click Power-Ups, Add Power-Up.
Go to the Custom option.
Select Hello World, then click Add.
You will now see the [Hello World] board button appears. You are now running a local developer environment from VS Code with a live running debug in Trello. Go make a code change, refresh the browser and viola – your updated code changes are there and ready to test.
Now a word about “DEBUG.” I have not found a way to really hook up VS Code to Edge/Chrome yet and live debug. I am sure there is a way and if someone knows, please add a comment — I will give it a whirl and add a future post. What I do instead is open F12. When I get an error, it usually tells me the exact line it failed on, and I can go there in VS Code. I also use a lot of console.log() statements to follow code flow and get results. And when I feel particularly stuck, I though in a good debugger; line or two in the code so the F12 tools stop, and I can review things there. In the end this has worked rather well, but I really would like to be able to set a breakpoint in VS Code too… for now, I am happy enough.
Conclusion
Creating a Trello Power-Up in Visual Studio Code using npm is the only way to go as far as I am concerned.
Happy coding, and remember, the possibilities are endless when it comes to creating Trello Power-Ups to match your specific workflow. And over time, I will probably extend on this Power-Up tutorial as I find new things to write about.
I have been working more and more with Linux lately. The job as a Program Manager has put some of my skills to the test. Oddly, I actually taught a semester of Linux back in my “college professor days.” And despite the kicking and screaming, funny enough, I am close to becoming a novice beginner at it.
Last year, I took the deep dive, spending nearly 100% of my personal time in Linux – command line and UI wise. I had an Ubuntu VM in the cloud that I worked with and repurposed on one of my old laptops with a distro of Elementary OS (essentially a MacOS like shell on top of Ubuntu).
Well, recently, I have been playing about with the Windows Subsystem for Linux. In the early days this was what I called a novelty. You could open a command prompt and start bashing out Linux commands and feeling totally geeky 🤓. However, recently, I found that you can now run Linux Applications in a window from Windows 11. This was a bit of a game changer, as now I can run Linux and Windows (side-by-side).
So, I just got through developing and testing an Office JS add-in (which I just published to the store) from Linux using VS Code and Microsoft Edge. It will hopefully be released soon, and I will blog it here (Send to Trello for Outlook Add-in).
Here is how I did it:
First, I would suggest installing Windows Terminal. I can spend a whole blog post on this and might, but it allows you to run CMD, PowerShell and BASH all side by side in tabs. It is awesome.
Open Terminal and install WSL. From a PowerShell tab type “wsl –install”. By default, this will put Ubuntu 20 (behind the scenes) on your system.
Once installed and you restart the Windows Terminal App, you should see Ubuntu as an option for opening a new Tab.
Select that. If it is your first time, you will need to supply it with a username and password.
Once setup, you simply need to start installing apps:
Type: “sudo apt update” to start updating the apps, this is like “Windows Update” for Linux.
Next, type: “sudo apt install x11-apps -y” to get the basic software installed.
Before you run it, you will want to type: “sudo su” and sign in. This signs you in as SUPER USER so that you can do things as an administrator.
After it is installed type “exit” to return to normal user mode.
Finally, install VS Code, like this: in the Terminal Window, type: “microsoft-edge” which will open Edge. From there go to Bing, search for “install VSCode on Linux” and it should not be too difficult to follow the steps you find. But to help out a bit… 😊 Follow the steps for Ubuntu, here: https://code.visualstudio.com/docs/setup/linux.
Now you can type “code” in the Linux command prompt and VSCode for Linux will open in a separate window. From there you can build your application and test it in Edge for Linux as well. That is what I did.
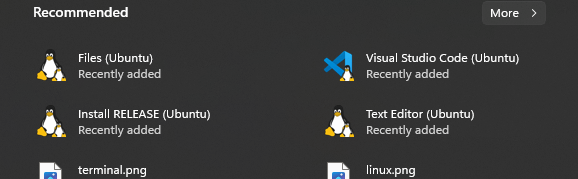
The coup-de-grace, it places these applications right on your START menu:
So, a friend asked me…”Uh, so.. like.. why?” I answered, “Uh… Because, I can!” 🤓
It has been a fun journey, learning something new and as it turns out, it has come in handy quite a few times in the new role as different aspects of the system we are developing cross paths with Linux. I also have a sneaky suspicion that this Windows/Linux integration lines are going to get a bit more “blurred” in the coming years (100% personal opinion).
To date I have created four Trello Power-Ups that I use every day to fill a gap that I need in order to scrum my life’s “backlog.” I was first turned towards Trello when I read Deep Work by Cal Newport. Since then I created:
And I am working on another for Outlook Calendar integration – with a possible companion OfficeJS Add-in to boot.
Each time I created a Power-Up, I found myself going back to the documentation over and over again for the most trivial items. So, I finally sat down and hacked out a type definitions file based on the existing Trello Power-Up Documentation.
You can find all the information about the type library I created here:
Another recent announcement that has me excited is the ability to debug Office Web Add-ins directly from VS Code. Before this recent announcement, it was a hit or miss proposition. There was Visual Studio 2019, that did a pretty good job. But I liked the lightweight simplicity of VS Code. Visual Studio 2019 seemed too too heavy-weight. It’s hard to put my finger on how or why, but I really enjoy VS Code for Web Add-in development so much better. Except for debugging…
So, to debug, I actually did most of my dev/test in the web versions of Office (Excel online, Outlook online, etc.). Then came the Edge Developer Tools Preview which helped debug task pane add-ins in the full clients. But that did not help with things like the On Send event in Outlook or other UI-less functions. So, it was a struggle at times.
The process is a tad more complicated than I like, but it does work. Essentially, you need to:
Run VS Code as administrator
Install the extension in VS Code by pressing CTRL + SHIFT + X and searching for the “Microsoft Office Add-in Debugger”
Add the following code to the .vscode\launch.json file to enable Office Debugging in your project. You will need to update line #7, and replace the uppercase HOST text with the host application for your Office add-in.
NOTE: If you create a new Office project with Yeoman, you will not need to add this line, it will be part of the default template going forward.
Press CTRL+SHIFT+D to then open the Debug pane, select Attach to Office Add-in option from the drop down list at the top of the pane, and press F5 to start debugging.
You can now set breakpoints, see variable values, etc.
I spent the better part of this morning trying to figure out why a new Yeoman generated Outlook add-in was not working with IntelliSense in VSCode. I would type “Office.” and nothing would appear. I would press CTRL+{SPACE} and still nothing.
After a lot of digging and comparing projects that did work to those that did not, I found that the @types were missing. So I then installed @types/office-js:
npm install @types/office-js
Once I did this, viola! IntelliSense started working like a charm. From my experience this has happened to me a few different times, in these given scenarios:
Moving an OfficeJS project from VS2017 to VSCode
Moving a Script Lab project to VSCode
Creating a blank OfficeJS project from scratch with just two files (manifest and webpage).
In my continued research I found that the way VSCode handles types is through NPM and you need to have data type definition files to get it all to work, that is why you need to install both NPM and the OfficeJS @types to get this to work. Per this page: https://code.visualstudio.com/Docs/languages/javascript
Automatic Type Acquisition (ATA) uses npm, the Node.js package manager, to install and manage Type Declaration (typings) files. To ensure that Automatic Type Acquisition works properly, first ensure that you have npm installed on your machine.
Secondly to that, for OfficeJS development, make sure you have @types/office-js.
At the MVP Summit 2018, I have had a number of conversations with various MVP’s that there really should be more documentation on how to get started with OfficeJS from scratch. Like web developer – from scratch.
So, this blog post is my attempt to get you started as if you have little to no web developer experience. The hope is that once you have read this and studied the linked content you will be able to:
Write HTML and JavaScript
Understand what JQuery is and how to use it
Setup your VSCode environment
Identify the key parts of an add-in (source code files)
Begin writing, and debugging your own code.
To get started, if you are completely new to web development (or even a little rusty and need a refresher), you might want to read the following articles/tutorials. If you already know this stuff, then you can move on:
NOTE: From these links you need to come away with an understanding of these basic fundamental concepts that are used heavily in OfficeJS:
How JavaScript and HTML work together
The HTML DOM model
How to write HTML and define controls (buttons, text boxes, etc.) with an id
How to use JQuery(*) to get a reference to a control on the HTML page and then manipulate it with JavaScript.
(*) JQuery is simply a library that, for simplicity sake, makes it easy for you to access and manipulate HTML controls via the DOM. You access it with a “$” character. This is why you might see so many “$”‘s in the sample/example code out there.
Once you know the basics of creating a web page, and manipulating it, you can then begin by setting up VSCode and learning how to code OfficeJS solutions. As for development environments, there are many out there, and many are nearly the same, but I suggest VSCode because it is simply a better environment to learn “webby” development. Especially if you are on a Mac. With that said, you will want to:
NOTE: A fundamental concept you need to come away with after working through the tutorials is to understand the “parts” of an add-in. I think the best way to understand the PARTS of an add-in:
All you really need for an OfficeJS solution are two files. A manifest and an HTML file.
To understand the anatomy of an add-in, you can read this post where I describe the most basic add-in you can create. Here is a simplified explanation to get your started:
The Manifest – an XML file that defines to Office your add-in. It defines things like the name, a unique id (GUID), the platform and app it supports, and most importantly your Ribbon (text, icons, etc), and what happens when you click those buttons. Specifically, it tell Office where to navigate when that button is clicked. Then this XML file is what gets “installed” in your Office app. Office reads it, places the button(s) on the Ribbon which loads the defined web page when clicked.
The HTML file – this contains “script” tags which point to all your code, supporting libraries (like JQuery) which similar to VBA/VSTO references. The HTML page also contains your Task Pane user interface (buttons, etc.).
The JavaScript file – This is your code, which will contain an Office.initialize() function that Office locates and executes when the HTML page is loaded. This can be a separate file or like the most basic add-in an inline script tag in your HTML file.
The entire load and run process for an add-in works like this:
The Manifest is loaded by Office and adds a button to the ribbon.
When the button is clicked, the HTML file specified in the manifest is loaded in the task pane.
When the HTML file is loaded, all the script tags (references and your own JS file) are loaded.
Once all the scripts are loaded, Office locates the Office.initialize() function and executes it.
It is in this code block that you can initialize your controls, like buttons on the HTML page, and what happens when the user clicks them.
I hope this is enough to get even the most novice non-web developer going. If you have any questions, please post them below. If there is any additional content you would like to see, please let me know.
The last thing I will leave you with is to answer an interesting question that arose this week:
Why would I learn to develop in OfficeJS? I am not interested in just making a web widget for Excel.
I think this is a common misconception. Office 365 Web Add-ins (OfficeJS) are at all not like Windows Vista Sidebar Gadgets for Office. They are actually quite powerful and there are many useful scenarios. Here are a few:
Integration with internal applications like CRM
Document tagging, or placing metadata on parts of the document, possibly linked with internal systems, controls or processes
Document building, either interactively through a task pane or dialog or from predefined rules
Advanced content editing, identifying and replacing specific content based on more complex rules than simple search/replace
Sending data from the document for more complex analysis and/or manipulation via back-end services and then updating the document with the results.
Once you delve a bit more into the object model and the capabilities, you will learn that you do not always have to open a task pane. You can open a dialog instead. Or, you can have no user interface at all, just have a button click on the ribbon perform work against the document like a macro used to do.
And here is another thought: Office is used by one-billion people world-wide across each of the supported platforms of Windows, Mac, web, iOS, and Android. The goal of these add-ins is to support the same code base (mostly) across all of these different platforms. You really can write-once/run-anywhere. You can build an add-in and then place it in the Microsoft Store and have it reach a huge audience. Do you need more of a reason to get started?
I thought I had written this some time ago, but I guess I did not. So here goes…
NOTE: First, I want to state that if you are creating applications for the full Office clients, it might be best to continue using Visual Studio 2017 as you are able to debug directly in these clients with much more ease than you can from VSCode.
Some might find it hard to believe, but I have been geeking out hard and using VSCode to develop OfficeJS (Office 365 Web Add-ins). I find it a very useful, light client, where I am able to focus on just the basics. When combined with tools like Node Package Manager (NPM), browser sync, Yoeman and Git, you have a surprisingly robust development environment what makes doing things delightfully easy. But it was not always this way, I had a learning curve and it took me a while to get it all setup and running correctly. I am not saying it was hard, just… different. So I channeled my inner geek and much to his delight, it turned out for the better.
So as I stated the challenge was getting it all setup. This is going to be very different, especially if you are coming from the Visual Studio 2017 world (much more so, from the VBA world). So, here are the step by step instructions I use for getting my VSCode development environment all configured for Office Development:
Download and install Node to get Node Package Manager (NPM): https://nodejs.org/en/download/. On this page you will want to download the Windows/MSI/64-bit version.
Download and install Git: https://git-scm.com/download. On this page you will want to make sure you select to install the latest which is from the link in the upper right of the page.
Now we have the basic packages we need in order to begin development. What we need to do now is install the Yeoman generator. To do this:
Open VSCode
Press CTRL+`. This will open the console window. Alternatively you can go to the View menu and click Integrated Terminal
Switch to the Terminal in the Console and then type the following command: npm install —global yo
Now you are ready to start generating OfficeJS add-ins from VSCode, and these steps will walk you through the first one:
Type: yo office sample-1
Once you do this the scaffold generator will kick in and ask you a few questions. Answer them as I have, in bold, below:? Would you like to create a new subfolder for your project? No
? Which Office client application would you like to support? Excel
? Would you like to create a new add-in? Yes, I need to create a new web app and manifest file for my add-in.
? Would you like to use TypeScript? No
? Choose a framework: Jquery
? Would you like to open it now while we finish creating your project? Yes
Once complete you will not have a solution folder called sample1 under your user profile c:\users\<yourname>\sample-1, but the project will not be open in VSCode, yet…
To open your project on the File menu, click Open Folder and then browse to and open the sample1 folder, then press Select Folder. NOTE: If you are coming from Visual Studio where the tree of solution files appears on the right side of the screen, the “Explorer” in VSCode appears on the left and it is actually a listing of ALL files and ALL folders in the solution directory.
You will see the code files for your project on the left hand side in the Explorer. The key files of importance to you, getting started will be:
sample-1-manifest.xml – this is your manifest for publishing your add-in.
index.html – this is your primary page or “task pane” for your add-in.
In this example I will not have you edit any of the files, but the basics are completely provided to build a solution. At this point we will check this into Git. Press CTRL+SHIFT+G. This will open the Source Control repository page. Click the icon to the right of the words Source Control, to Initialize Repository. This will open the folder to your solution, simply click Initialize Repository. You can now work with Git to manage your project. I will not go into more detail, but if you are interested, please watch this video: https://git-scm.com/video/what-is-git
Finally, we are ready to debug. But first, if you are on Windows 10, and you use Edge or Internet Explorer as your default browser, I would strongly suggest using the Google Chrome browser because the debug tools are so much better. However, there is one change you need to make:
Open the bsconfig.json file in the Explorer
At the top of the configuration you need to place this line: “browser”: “chrome”, so that the file looks like this:
{
    "browser": "chrome",
    "ui": {...
To debug, press CTRL+` to open or return to the Integrated Terminal. Type: npm start. This will open your project in Chrome. You might get a warning that the site is not trusted, click Advanced and select to trust anyway / continue.
Open another tab and browse to office365.com. Once there, log into your account. On the Office menu in the upper left, click Excel. On the Insert menu, click Office Add-ins. In the upper right of the dialog, click Upload my add-in. Click Browse and then select the file: c:\users\<yourname>\sample-1\sample-1-manifest.xml. Your add-in will now load on the Home tab, switch there, and press Show Taskpane.
This looks like a lot of work and I know for most of you that are like me, coming from a Visual Studio and/or VBA background, this is very alien. You might consider this a step backwards or it might seem like it is time to hang up the spurs. But give it some time, especially if you are just getting into OfficeJS, it will grow on you. In the meantime, here are some of my other blog entries around this to help you:
Please let me know if you have questions or would like some help with any of this. What I hope to be able to do at some point is to add posts on:
Importing a Script Lab project into a Yo Office scaffold
A video on the steps outlined in this post. I have done videos for internal training at Microsoft before, but never on my own for my blog. So this will be new territory if I can get around to it.
Other samples posts to getting started with various projects.
If you have any ideas of what you would like to see, please let me know.