I have been using Trello for a while now and one of the features I have found most useful is to take an email I received and turn it into a Kanban item on my backlog to address later. This allows me to archive the email but keeps it on my “Trello radar” as I work at my own pace through my personal backlog.
Recently, Trello removed their add-in from the Microsoft Office store. If you have the add-in installed, you will see this error:
Well, since they say necessity is the mother of all invention and I really had to fill the gap as it is part of my routine, I rolled my own. 🤓 To add a degree of difficulty, I wrote this in VS Code in Linux running in Windows Subsystem for Linux (WSL). See my previous post. It was a fun exercise as I am on vacation and using the time tom learn new things, engage in self-improvement and relax (coding is relaxing to me 🤓🤓🤓). In the end, I learned something and created something for everyone to enjoy.
I have been working more and more with Linux lately. The job as a Program Manager has put some of my skills to the test. Oddly, I actually taught a semester of Linux back in my “college professor days.” And despite the kicking and screaming, funny enough, I am close to becoming a novice beginner at it.
Last year, I took the deep dive, spending nearly 100% of my personal time in Linux – command line and UI wise. I had an Ubuntu VM in the cloud that I worked with and repurposed on one of my old laptops with a distro of Elementary OS (essentially a MacOS like shell on top of Ubuntu).
Well, recently, I have been playing about with the Windows Subsystem for Linux. In the early days this was what I called a novelty. You could open a command prompt and start bashing out Linux commands and feeling totally geeky 🤓. However, recently, I found that you can now run Linux Applications in a window from Windows 11. This was a bit of a game changer, as now I can run Linux and Windows (side-by-side).
So, I just got through developing and testing an Office JS add-in (which I just published to the store) from Linux using VS Code and Microsoft Edge. It will hopefully be released soon, and I will blog it here (Send to Trello for Outlook Add-in).
Here is how I did it:
First, I would suggest installing Windows Terminal. I can spend a whole blog post on this and might, but it allows you to run CMD, PowerShell and BASH all side by side in tabs. It is awesome.
Open Terminal and install WSL. From a PowerShell tab type “wsl –install”. By default, this will put Ubuntu 20 (behind the scenes) on your system.
Once installed and you restart the Windows Terminal App, you should see Ubuntu as an option for opening a new Tab.
Select that. If it is your first time, you will need to supply it with a username and password.
Once setup, you simply need to start installing apps:
Type: “sudo apt update” to start updating the apps, this is like “Windows Update” for Linux.
Next, type: “sudo apt install x11-apps -y” to get the basic software installed.
Before you run it, you will want to type: “sudo su” and sign in. This signs you in as SUPER USER so that you can do things as an administrator.
After it is installed type “exit” to return to normal user mode.
Finally, install VS Code, like this: in the Terminal Window, type: “microsoft-edge” which will open Edge. From there go to Bing, search for “install VSCode on Linux” and it should not be too difficult to follow the steps you find. But to help out a bit… 😊 Follow the steps for Ubuntu, here: https://code.visualstudio.com/docs/setup/linux.
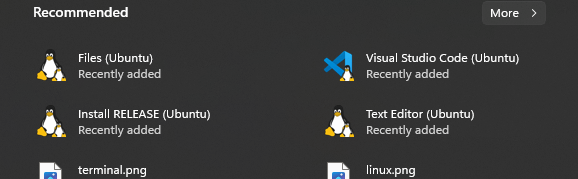
Now you can type “code” in the Linux command prompt and VSCode for Linux will open in a separate window. From there you can build your application and test it in Edge for Linux as well. That is what I did.
The coup-de-grace, it places these applications right on your START menu:
So, a friend asked me…”Uh, so.. like.. why?” I answered, “Uh… Because, I can!” 🤓
It has been a fun journey, learning something new and as it turns out, it has come in handy quite a few times in the new role as different aspects of the system we are developing cross paths with Linux. I also have a sneaky suspicion that this Windows/Linux integration lines are going to get a bit more “blurred” in the coming years (100% personal opinion).
I have done it! I have published my very first Office Web Add-in to the Microsoft Store. After years and years of blogging about it, I wrote an add-in for something I needed. It is true that necessity is the mother of all invention.
The add-in is called the Trello Taskpane for Word. It is a simple add-in that connects Word to your Trello boards, so that you can insert information you have collected in Trello into your documents. I do research on the web for various topics and send snippets and pages to Trello cards where I organize and refine them. Then I found myself copy/pasting the information from Trello into Word getting lost on the task switching. Now, I can remain in Word, select the cards I want, and insert them without ever leaving Word. How’s that!
It was also a fun exercise for me to combine the two types of extensions I have found to enjoy writing (Office and Trello). More importantly, it is a useful tool that I think might benefit other writers that use Trello, or writers looking for a new way to keep their notecards and thoughts in a more digital, accessible from anywhere type of format.
I have been spending some of my free time writing add-ins for Office and Power-Ups for Trello. I just completed two add-ins for Office. One is going through the process with AppSource and I will blog about it soon enough. The other cannot go though AppSource because it uses the Block On Send interface for Outlook. The add-in I just release is the 5entences Add-in for Outlook.
I have been inspired by various books I have read that all cross-pollinate the idea that we use e-mail all wrong or too much. Cal Newport’s “A World without Email” and Tim Ferris’ “4 Hour Workweek” are just two examples. And I believe it was Tim’s book that first touched on brevity in email. And thus, this website was born: five.sentenc.es.
From those books, and website, I had an idea. Why not add “training wheels” to the idea of email brevity? So, I wrote the 5entences Add-in for Outlook as a simple to use add-in that tries to help you keep your email responses brief and to the point.
It has been a fun side project as I was delving deeper into writing React code and using prebuilt React controls, so I wanted to share it with everyone. Maybe we can make email fun again.
Here is the path in the policy editor for this setting:
Once in the policy editor, you would set the value. If your OfficeJS Web Add-in has a GUID of {c5bc7737-0d79-4302-9e73-2a614941e914} and the COM add-in is called “My Full Featured Outlook Add-in“, you would set the values like this:
Specifically, the registry key it puts in place is this:
This was more than a patch this time. It was a minor update to two functions:
sendMailItem
sendPlainTextEmailWithAttachment
There was an issue reported (#12) where the sendMailItem function was not working in IE11. This was because it was created to take an inline object (ES6). Well on IE11 (which only supports ES5), it broke.
So, I fixed sendMailItem to support ES5 and also took the opportunity to add two often requested features of this function:
It will now allow you to submit HTML body content or Text. It will also parse the HTML for you if you submit it as is.
It will also now allow you to send both file attachment (new), and mail item attachments (original).
Also I updated the sendPlainTextEmailWithAttachment function. Under the covers this uses the sendMailItem function. So I had to update it to use the new format so it would work as well. There was no change to it’s features/functionality however.
I did not get to the last item I have had requests for:
ability to specify recipients as To/CC/BCC. I will update this at some future date. Also, please let me know if you would like to see this.
Overall, the goal is to have the sendMailItem() function be a full multi-purpose function at some point. It is almost there, but please keep the suggestions coming.
There were a couple small bug fixes in the splitGroupsRecursivelyAsync() function. Thank you to Jack for making me aware of the issue as it has now been corrected.
The CDN to the latest versioned instance of the library:
While working on a customers proof of concept, we determined that we needed to know who the current user opening the add-in is. In most scenarios where there is a Store Add-in, you have the user log in. But we are in a enterprise environment, have an embedded taskpane and did not want to nag the user every single time they opened the document.
Outside of the BETA API set, there actually is not a way to do this in Word, Excel and PowerPoint. In the current BETA API (soon to be released), is the new Single sign-on (SSO) API. Detailed here:
This file contains hidden or bidirectional Unicode text that may be interpreted or compiled differently than what appears below. To review, open the file in an editor that reveals hidden Unicode characters.
Learn more about bidirectional Unicode characters
There was a small problem with if you have “use strict” and are in the full Outlook client where the easyEws library would fail on compile on the getParentId function.
This is fixed in this version. To get the latest simply run:
npm update easyews
Or, you can reference the latest build at the CDN:
There is one major change and one fix in this update:
The library no longer has any dependencies on jQuery. As such all parsing is done with DOMParser and all loops are traditional (for, versus $.each()).
NOTE: This is a fairly major change as it touches the core asyncEws call, which is at the very core over every call in the library. If you have an issue with this build, please point to the previous build of the library directly. See more below…
The sendPlainTextEmailWithAttachment() function was fixed to submit parameters as a Object versus individually.
The GitHub repository has all previous versions. For example, to access the primary CDN, go to: